A description of the basic, overall problem
One of the biggest problems that seems to be creeping into the world of Software Development, particularly for open source and independent developers, is the "Toll Booth" that's crept into place, and the cottage industry that supports it.
I'm mostly talking about SIGNED CODE, and the 'Root CA' certificates that are almost PRIVILEGED to own and exploit people with. I mean, SERIOUSLY, WHY must I pay $150 (or up to several HUNDRED DOLLARS) for a 1 year 'privilege' to 'sign' my own applications so that they will WORK on 'whatever system'? Or what about SSL certificates for a test web server? Oh, sure, I can go the 'self-signed' route, but it does NOT always work for everything (see the section on kernel device drivers at the end).
So, in efffect, if I want to write an OPEN SOURCE DEVICE DRIVER to do some specialized 'thing' for windows (which I do), even if it requires having an MSDN Subscription (that I pay an annual license for) to BUILD it, I would STILL need a SIGNING CERTIFICATE to "sign" the driver and VERIFY that it's 'ok enough' for the operating system to go ahead and LOAD it. It gets worse as Microsoft adds EVEN MORE code signing requirements in Windows 10 (aka 'Win-10-nic'). Is there *ANY* end in sight? Is there *ANY* hope for independent small-time developers, especially OPEN SOURCE developers?
Well the 'dirty little secret' is that you do NOT NEED A CERTIFICATE AUTHORITY. Even though a 'self-signed' certificate may NOT do for a non-debug environment, there is STILL a way you can manage this little problem: YOU (yes, YOU) can BECOME YOUR OWN CERTIFICATION AUTHORITY!!!
The basic certification process
The basic certification process involves a ROOT CERTIFICATE which is 'self-signed'. This will be kept someplace that identifies it as a "Trusted Authority". There can ALSO be intermediate trusted authorities, which are "signed" by a root certificate, and other certificates that the intermediate trusted authorities sign, and so on. At the bottom, you have a driver or program or SSL certificate that has been 'signed' that identifies this 'chain of trust'.
At least, that's how it's SUPPOSED to work. But there IS a 'weak link', so to speak, if a certificate were to be added as a "Trusted Authority", ANYTHING signed by it would become 'trusted'.
THIS is BOTH a GOOD AND a BAD thing.
The root certificate would have a public/private key set up for it, and the private key would be needed for the signing process. The root certificate could be issued without the private key, and be installed on any system that might have code or certificates signed using its private key. This is generally how everything on the internet is set up, and how Microsoft's certificate signing for drivers (and now, code) should work. [NOTE: this has yet to be verified, but I'm working on it at the moment]
SO, the trick is to configure your installation system (possibly THIS ONE) so that you INSTALL YOUR OWN ROOT CERTIFICATE, before you attempt to install the application or device driver or whatever. THEN, whatever 'thing' the operating system uses to VALIDATE your code will see the root certificate, and recognize that the signature is AUTHENTIC, and VOILA! You install YOUR application (or whatever), and don't have to pay the TOLL to some cottage industry 3rd party certifier.
An existing 'open' certificate authority, cacert.org, will issue signing certificates for free (as long as you become a member, which is also free). However, it's likely that THEIR root certificate is NOT on the target system. You would STILL have to add it yourself, with your own installer. Perhaps at some point in time they will be recognized and appreciated. But I digress...
Generating your OWN Root Certificate
So, you can begin the process by generating your OWN Root Certificate. This is VERY easy if you are on a Linux, BSD, Mac, or other POSIX system with OpenSSL installed. For windows, you can install Cygwin and THEN install the OpenSSL package, or install a native implementation for OpenSSL from HERE.
NOTE: I used information found HERE as a starting point, when discovering how to make this process work. You may also find this web site useful.
Using OpenSSL, you can issue the following commands (substitute your own file names)
- Create the key for your root certificate
This key will be used in the signing process, and should be password protected. Otherwise, it could be abused if the key ever got out of your hands. Yes, this kind of thing happens.
To create a password-protected key into the file 'MyCert.key':
openssl genrsa -des3 -out MyCert.key 2048
The key size parameter is 2048, as in the web-page example (from above). You can pick a different value if you like. - Create a self-signed 'root' certificate 'pem' file
This will create a self-signed root certificate. You will be asked several questions for information to be embedded in the certificate. The 'CN' will appear as the name of the certificate, so choose wisely.
openssl req -x509 -new -nodes -key MyCert.key -sha256 -days 365 -out MyCert.pem
The sample creates a certificate that is good for one year (365 days). you should consider limiting the expiration date of your certificate, and just create a new one whenever it expires. This limits the possibility of it being exploited for nefarious purposes. - Convert the certificate into a '.cer' file in X.509 DER format.
You can convert it easily with a command similar to the following:
openssl x509 -in MyCert.pem -outform der -out MyCert.cer
This 'cer' file in step 3 is what you'll want to make available. Using the code example below, you could install it automatically (during your install process) on a Microsoft Windows system that supports the Crypto API. It needs to run with 'Admin' privileges.
#include <stdio.h>
#include <stdlib.h>
#include <windows.h>
#include <wincrypt.h>

#pragma comment(lib,"crypt32.lib") // include crypto lib

HCERTSTORE MyOpenSystemCAStore(void)
{
  HCERTSTORE hSysStore;

  hSysStore = CertOpenStore(CERT_STORE_PROV_SYSTEM,          // The store provider type
                            0,                               // The encoding type is not needed
                            NULL,                            // Use the default HCRYPTPROV
                            CERT_SYSTEM_STORE_LOCAL_MACHINE, // local machine, registry location
                            L"ROOT");                        // store name, must be UNICODE

  // other stores you might be interested in:  CA, TrustedPublishers
  // 'CA' is for intermediate cert authorities; 'TrustedPublishers' is for verifying code-signing certs

  return hSysStore; // NULL if failed
}


int main(int argc, char *argv[])
{
HCERTSTORE hCertStore = NULL;
BYTE *pBuf;
DWORD cbBuf;
FILE *pIn;


  if(argc < 2)
  {
    fprintf(stderr, "USAGE:  RootCert certname\n");
    return 1;
  }

  // read file

  pIn = fopen(argv[1], "rb");
  if(!pIn)
  {
    fprintf(stderr, "File open error, %d, on %s\n", GetLastError(), argv[1]);
    return 2;
  }

  fseek(pIn, 0, SEEK_END);
  cbBuf = ftell(pIn);
  fseek(pIn, 0, SEEK_SET);

  pBuf = (BYTE *)malloc(cbBuf + 2);
  if(!pBuf)
  {
    fprintf(stderr, "Unable to allocate buffer size %d, %d\n", cbBuf, GetLastError());
    fclose(pIn);
    return 3;
  }

  int cbTemp = cbBuf;
  BYTE *pTemp = pBuf;

  while(cbTemp > 0)
  {
    int cb1 = fread(pTemp, 1, cbTemp, pIn);

    if(cb1 < 0)
    {
      fprintf(stderr, "read error %d of %d, %d\n", cb1, cbBuf, GetLastError());
      fclose(pIn);
      return 4;
    }
    else if(!cb1)
    {
      fprintf(stderr, "WHAT TEH BLANK?? %d remains unread\n", cbTemp);
      fclose(pIn);
      return 5;
    }

    pTemp += cb1;
    cbTemp -= cb1;
  }

  fclose(pIn);
  pIn = NULL;

  hCertStore = MyOpenSystemCAStore();

  if(!hCertStore)
  {
    fprintf(stderr, "Error %d opening store\n", GetLastError());
    return 1;
  }

  // add specified cert to the specified store (in this case, 'ROOT')
  // to modify the store you write to, update the 'MyOpenSystemCAStore' function

  fflush(stderr);

  if(CertAddEncodedCertificateToStore(hCertStore,
                                      X509_ASN_ENCODING,
                                      pBuf,
                                      cbBuf,
                                      CERT_STORE_ADD_NEW,
                                      NULL))
  {
    fprintf(stderr, "Added cert successfully\n");
  }
  else
  {
    DWORD dwErr = GetLastError();

    if(dwErr == CRYPT_E_EXISTS)
    {
      fprintf(stderr, "Cert exists (not added)\n");
    }
    else if(dwErr == E_INVALIDARG)
    {
      fprintf(stderr, "CERT is not valid\n");
    }
    else if(dwErr == CRYPT_E_ASN1_BADTAG)
    {
      fprintf(stderr, "CERT tag is bad\n");
    }
    else
    {
      fprintf(stderr, "Unable to add cert, error %d (%08xH)\n", dwErr, dwErr);
    }
  }

  CertCloseStore(hCertStore, 0);

  free(pBuf);

  printf("Done");
  return 0;
}
So, in short, it's a fairly straightforward process, to create your 'root CA' certificate, then add it into the system's certificate store as a trusted CA. The above code is right out of Microsoft's documentation, effectively, and simply puts the certificate you specify on the command line into the 'ROOT' certificate store, labeled 'Trusted Root Certification Authorities' if you run 'certmgr.msc' with Admin privileges on a Windows system (XP or later).
Now you have your own ROOT CA, so what do you do with it?
You create the PUBLISHER/ENTITY Signing Certificate!For the purpose of this web page, we're interested in making certs that sign code. And so the next steps will generate JUST THAT, a 'Publisher' certificate that you can sign code with. You will be prompted for passwords at a couple of points, and for other information. Since you can generate as many as you like, using YOUR very own Root CA certificate, you should experiment with the data entry and possibly automate it all. I did.
- Create another key for your code signing certificate
This key will be used in the code signing process, and should NOT be password protected. Don't let it get out of your control.
To create a non-password-protected key into the file 'MyCodeSigningCert.key':
openssl genrsa -out MyCodeSigningCert.key 2048
The key size parameter is 2048, as before. Use whatever you like. - Create a certificate 'request' file
This is an intermediate step for creating a signed certificate. Again, you will be asked several questions for information to be embedded in the certificate. The 'description' needs to be chosen carefully, as this will appear as the name in your certificate store (if you import it), and in some cases needs to 'match' something to be valid (such as an SSL certificate).
openssl req -new -key MyCodeSigningCert.key -out MyCodeSigningCert.csr -reqexts v3_req -nodes
This creates the REQUEST for a certificate. Once done, you can use this multiple times to create certificates with newer expiration dates, as needed. Also, the '-nodes' parameter keeps it from encrypting the key, so you should NOT let this thing out of your hands. As far as I can tell, '-nodes' is necessary. - Create a certificate file with an expiration date and additional info
This step creates the actual certificate. To do this properly, you need to create a small file that contains the correct options for your certificate, since the default openssl implementation does not seem to have this. For this step I used a shell script. YMMV
    #!/bin/sh

    cat >temp.cnf <<THING
    [usr_cert]
    nsCertType = objsign
    basicConstraints=CA:FALSE
    subjectKeyIdentifier=hash
    authorityKeyIdentifier=issuer
    crlDistributionPoints = URI:http://example.com/intermediate.crl.pem
    authorityInfoAccess = caIssuers;URI:http://example.com/MyCert.cer
    keyUsage = nonRepudiation, digitalSignature, keyEncipherment, dataEncipherment, keyAgreement, keyCertSign
    extendedKeyUsage = codeSigning, 1.3.6.1.4.1.311.10.3.5, serverAuth, clientAuth, emailProtection, timeStamping, \
                       OCSPSigning, msCodeInd, msCodeCom, msCTLSign, msEFS

    THING

    # this is an alternate for 'extendedKeyUsage' - see note 4
    # extendedKeyUsage = codeSigning, 1.3.6.1.4.1.311.10.3.5, 1.3.6.1.4.1.311.10.3.13, serverAuth, clientAuth, \
    #                    emailProtection, timeStamping, OCSPSigning, msCodeInd, msCodeCom, msCTLSign, msEFS

    openssl x509 -req -in MyCodeSigningCert.csr -CA MyCert.pem \
            -CAkey MyCert.key -CAcreateserial \
            -extfile temp.cnf -extensions usr_cert \
            -out MyCodeSigningCert.crt -days 365 -sha256
Then, if you want to view the resulting certificate's encoded information, you can do so with this command:openssl x509 -noout -text -in MyCodeSigningCert.crt
NOTE 1: The 'crlDistributionPoints' uses a URL with 'example.com' - provide your OWN online revocation list cert in its place at the URL you specify. See 'Revocation Lists'. (this entry is optional)
NOTE 2: The 'authorityInfoAccess' also uses a URL with 'example.com' - provide your OWN online copy of the root cert (i.e. MyCert.cer) at the URL you specify. (this entry is optional)
NOTE 3: The '1.3.6.1.4.1.311.10.3.5' entry in 'extendedKeyUsage' appears to be an older spec that was intended for kernel driver signing (specifically 'WHQL') for Plug & Play Devices. It took a little hacking and digging to figure this one out. THIS web page defines it as 'OID_WHQL_CRYPTO'. Other places (including CertMgr) define it as "Windows Hardware Driver Verification". This seems to be an old standard but I included it here anyway. It's a nice example of a 'custom OID' if nothing else.
NOTE 4: The Microsoft example for making a code signing certificate (from HERE) has the following additional parameter, which they say restricts the usage of the certificate: /eku "1.3.6.1.5.5.7.3.3,1.3.6.1.4.1.311.10.3.13"
The '/eku' parameter (2 OID values, comma and no space separates them) corresponds to the 'extendedKeyUsage' member of the '[usr_cert]' block that is written to the temporary configuration file. The first 'OID' in that list is 'codeSigning', and the second is (apparently) a Microsoft custom OID that CertMgr.msc displays as "Lifetime Signing". What it ACTUALLY does is somewhat different from what you expect, according to The Cabinet File Code Signing Requirements document (dated Nov 19, 2015) in which it says "If a Code Signing Certificate contains the Lifetime Signing OID," (aka '1.3.6.1.4.1.311.10.3.13'), "the Signature becomes invalid when the Code Signing Certificate expires, even if the Signature is timestamped." Translation, when the cert expires, the code isn't supposed to work any more [this might be expected behavior of a TEST CERTIFICATE], actually, and the PDF document suggests that this is typically what it's used for].
As a result, the 'extendedKeyUsage' definition in the shell script (above) has 'codeSigning' but NOT the 'Lifetime' OID. However, for the purpose of documentation, I included a commented-out section that will not be written to the temporary 'temp.cnf' file, which shows how you would add the OID if you wanted to. There are also some additional items assigned to 'extendedKeyUsage', basically "all of the rest I could find". The apparent reasoning, that 'extendedKeyUsage' LIMITS what the certificate can do, such that whenever this certificate entry is NOT defined, the extended usage is 'un-restricted'. Further, the newest code signing requirements are that you MUST have this entry in the certificate. So defining it restricts the usage (to help protect against mis-use), and its presence is REQUIRED. Additionally, I'm concerned that Microsoft may NOT allow signed drivers and signed code to load WITHOUT its presence. So (in sticking with the intent of their documentation) I have included the proper 'extendedKeyUsage' line in the example, here.
So in summary, the example from the 'openssl' command (above) basically allows ALL usages except 'Revocation List' related functions, AND includes an 'extended key usage' for Code Signing (but NOT "Lifetime Signing") and everything else I could find. And if you want to manage the certificate's capabilities, you can always add or remove items from the 'keyUsage' or 'extendedKeyUsage' assignment, as you see fit. For more information, see the OpenSSL config file documentation
- Create a 'pfx' certificate file that Microsoft's CertMgr can import along with a key
This step is very important, because without the private key, you can't use it for CODE SIGNING, and that was the whole POINT, right? So, we do that here. You'll be prompted for passwords again. When you password protect the file, a blank password is ok if you want. I did that for my test.
openssl pkcs12 -export -out MyCodeSigningCert.pfx -inkey MyCodeSigningCert.key -in MyCodeSigningCert.crt
NOW, you have a 'pfx' file that you can import with Microsoft' Certificate Manager 'CertMgr.msc'. - As before, convert the certificate into a '.cer' file in X.509 DER format.
You can convert it easily with a command similar to the following:
openssl x509 -in MyCodeSigningCert.crt -outform der -out MyCodeSigningCert.cer
This file is the one you will install on end-user machines in the 'TrustedPublisher' folder when signing code. As with the 'ROOT' store, you have to do this with Admin privileges so that it goes into the 'Local Machine' store rather than the 'user' store. A program similar to the one above would then use L"TrustedPublisher" rather than L"ROOT" in the 'CertOpenStore()' call.
Revocation Lists
(yes, this is actually important!)
In the rare case that your signing certificates are mis-used, you will need to set up a 'Revocation List' cert, and put it someplace where the world can find it, and maintain this list with the certificates that you want to 'revoke'. I suggest creating one that's empty, and placing it in the URL location that you specified when you created the cert. This would be the 'crlDistributionPoints' entry in the example, above.
To create an empty CRL, perform the following with your Root CA cert:
- Create an empty 'revocation list' index file in a new directory 'demoCA':
touch demoCA/index.txt echo "00000000" >demoCA/crlnumber - or - (in windows) copy nul demoCA/index.txt echo 00000000 >demoCA/crlnumber NOTE: your 'openssl.cnf' file may have a different path specified for 'dir' in the '[ CA_default ]' section. You can edit the 'openssl.cnf' file and change this, or use whatever path is specified. In the OSs I have reviewed, it is './demoCA'. This file (openssl.cnf) is usually located in '/etc/ssl'; on Cygwin, it is in '/usr/ssl'. Unfortunately, there does not seem to be a command line option for this, and the openssl.cnf file is too complex to copy/edit it into a demo shell script. You can be assured that if I find a nice hack for this, I'll update this document with it. - Create the revocation list cert from the revocation file:
openssl ca -gencrl -keyfile MyCert.key -cert MyCert.pem -out MyCert.crl.pem -crldays 365 In this case, the CRL will be 'good' for 365 days. This is the period of time before the next update. If you want to keep re-issuing this, make it a small number (like 5). If you want it to last forever, it should be at least as long as the valid period for your cert.
And NOW, you can sign your programs!
Now it is time to refer to some Microsoft documentation, to avoid having to replicate it all here. Suffice it to say, you need to IMPORT that 'pfx' certificate into the certificate manager. You can create a new store, or use an existing one, or use the 'certmgr.exe' utility that Microsoft provides with the SDK and WDK to add the certificate where it needs to go. For more information, go HERE and HERE and HERE. Additionally, the use of 'SignTool' and other related tools is documented there as well. And it's likely you'll need to add these certificates to multiple places in order to satisfy the requirement for code signing, so you should give those pages a good once-over to familiarize yourself with the various requirements.
Placing the code-signing certificate into a convenient 'store'
In order to use the 'SignCode' utility to sign your code, you need to have the certificate (the one with the embedded password) stored in your user's 'Certificate Store'. You can manage that with the 'CertMgr.msc' control panel management console thingy.
You can use 'start menu / run' to execute 'CertMgr.msc'. This opens the dialog box so that you can manage the certificates.
NOTE: you should PROBABLY add your root certificate to 'Trusted Root Certification Authorities' (aka 'ROOT') first. Keep in mind that even in 'Admin' mode, you can't do this properly with CertMgr.msc (the certs will go into the USER store, and not the 'local machine' store). To place them into the 'local machine' store, see the C code example above, or use Microsoft's specialized 'MakeCert.exe' to do this. For code-signing you'll need 3 entries; the root cert goes into "ROOT", and the code-signing cert goes into both "TrustedPublishers" and "CA" (aka 'Intermediate Certification Authorities').
Signing your code with your new 'issued' certificate
Now that you've put the certificate 'package' (with password protection and embedded key) into your personal store, you
can use it to sign your application, a device driver's 'cat' file, a 'cab' file, or whatever. The typical command for
signing something will look like this:
SignTool sign /s "PrivateCertStore" /n "MyCodeSigningCert" /t http://timestamp.verisign.com/scripts/timstamp.dll MyCode.exe
where the certificate name (rather than 'MyCodeSigningCert') will be the one you assigned when you created the certificate
request (csr) file, and 'MyCode.exe' is the executable file (or other object) you are signing. The certificate name will
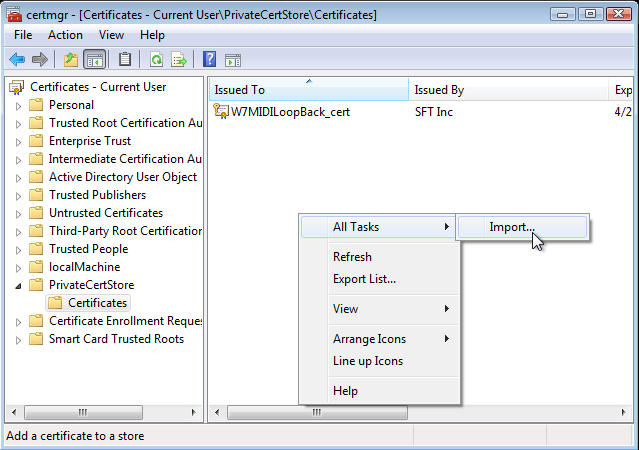
show up in the 'CertMgr.msc' display after you have added the cert, as a double-check. In the screen capture image above,
I have already imported a cert for a proof of concept device driver called 'W7MIDILoopBack' and I named the cert
'W7MIDILoopBack_cert'. That's the certificate name I use in the 'SignTool' command when I sign the driver.
Windows Kernel-Mode Device Drivers
A rather *SAD* reality in all of this is that, for "load at boot time" kernel drivers, the normal method
of certificate stores is not used. What actually happens is that a 'cross certificate' is used to sign the driver code,
and that 'cross certificate' is assigned by Microsoft [it appears to use their internal root cert to act like an 'embedded
certificate authority' within the driver itself]. In effect, only a
very SMALL NUMBER
of 'APPROVED ROOT AUTHORITIES' have a 'cross certificate' available, and 'cacert.org' is NOT in "the list".
Further, updates like KB2506014 (and apparently a whole bunch more) disable the use of 'your CA' for kernel drivers
However, if you enable
'test signing'
in the OS (should work for any 'Vista or later' Windows), you would be able to load any 'signed' kernel driver.
For "testing". Or personal use. The procedure is well-known, involves the use of 'bcdedit', and requires setting
a couple of boot variables:
    bcdedit /set TESTSIGNING ON
    bcdedit /set loadoptions DISABLE_INTEGRITY_CHECKS
(you may or may not need to remove KB2506014 in addition to this)
At least THIS way, you can run your custom driver to do 'whatever', though it appears that DRM stuff might be disabled as a result. But who cares about that (besides MICROSOFT) anyway?
To use the 'SignTool' with a kernel driver, you'd add the 'cross certificate' with the "/ac certname.cer" parameter,
similar to the following:
SignTool sign /ac "CrossCert.cer" /s "PrivateCertStore" /n "MyCodeSigningCert" {...} MyCode.exe
where 'CrossCert.cer' is (effectively) a root cert authority that was signed by Microsoft's built-in cert (and the '{...}' keeps
the line length short for readability - see earlier example for other params).
However, if you were to enable 'test certificate' signing, you could add your own root cert in place of the 'CrossCert.cer', i.e. the 'MyCert.cer' cert you created as your root CA. For making your OWN drivers, for your own personal use, this might just be 'good enough'.
It is worth pointing out that, in an unpatched Windows 7 SP1, a driver that is NOT loaded at boot time can still use the normal security chain (I was doing this for testing my own driver, as an example). But when you view its security info, it will appear as an 'un-signed' driver.